เชื่อมต่อ Smart Contract บน Binance Smart Chain ด้วย go-ethereum
สวัสดี!
วันนี้เราจะมาเขียนโปรแกรมเพื่อที่จะติดต่อกับ Smart Contract บน Binance Smart Chain (ผมจะเรียกย่อ ๆ ว่า BSC นะครับ) ด้วยภาษา golang จุดเริ่มต้นของเนื้อหาในวันนี้เริ่มจากผมเริ่มเข้าสู้วงการ DeFi เเล้วก็มารู้จักการทำ staking เหรียญ (เหมือนเราเอาเงินไปวางเดิมพันเเล้วเราจะได้ reward กลับคืนมา) ซึ่งผมได้ไปลองเล่น pancakeswap ซึ่งเป็น exchange เจ้าดังเจ้าหนึ่ง โดยผมได้ลองเอาเหรียญ cake ไป staking เพื่อเอา cake กลับมา แต่ทีนี้ระบบมันจะมีสิ่งที่เรียกว่าการ compound คือการหลอมเหรียญ reward ที่ได้กลับเข้าไปใน pool ซึ่งจะทำให้เราได้รับรางวัลมากขึ้น ซึ่งปกติเราก็ต้องเข้าเว็บ pancakeswap เเล้วก็เข้าไปกด compound ด้วยตัวเอง จริง ๆ เเล้วทาง pancakeswap ก็มีบริการทำ auto compound สำหรับ pool cake-cake แต่ต้องต้องเสียค่าธรรมเนียมให้กับเค้า ซึ่งผมก็ไม่อยากเสีย 5555 ก็เลยลองนั่งคิดว่าเป็นได้มั้ยว่าเราจะทำโปรแกรมอันนึงที่ทำแบบนี้ได้บ้าง(แต่เรายังคงต้องเสียค่าธรรมเนียมอยู่ดี แต่จะไม่ได้เป็น %) ก็เลยได้ลองศึกษาวิธีที่เราจะสามารถเขียนโปรแกรมติดต่อกับ BSC (Binance Smart Chain) ได้ แล้วก็ที่เลือกใช้ golang เพราะเป็นภาษาที่ผมไม่เคยเขียนก็เลยอยากจะลองใช้มันดูด้วย
ตัวอย่างในวันนี้เราจะมาลองสร้าง smart contract แบบง่าย ๆ เพื่อที่จะ deploy ขึ้น test network ของ BSC เเล้วก็ลองใช้โปรแกรมของเราติดต่อกับ contract นั้นดู
สิ่งที่ต้องมีก่อนที่จะเริ่มทำ
- account บน metamask ที่มี BNB บน test network ของ BSC
- สามารถไปค้นหาวิธีการสร้าง account เเละการ setup ให้ account ของเราไปต่อกับ test network และการขอ BNB ฟรีเพื่อทำ write ops ใน google ได้
- golang version >= 1.11
- docker สำหรับรัน abigen
สร้าง Smart Contract แบบง่าย ๆ
การเขียน Smart Contract บน BSC จะใช้ภาษา solidity ซึ่งเป็นภาษาเดียวกันกับ Smart Contract บน Ethereum และการ deploy Smart Contract ของเรานั้นจะใช้ remix ในการ deploy
-
ให้เข้าไปที่เว็บ remix แล้วจะเจอหน้าแรกแบบนี้
-
ในแถบด้านซ้าย ให้สร้างไฟล์
MyContract.solในโฟล์เดอร์contracts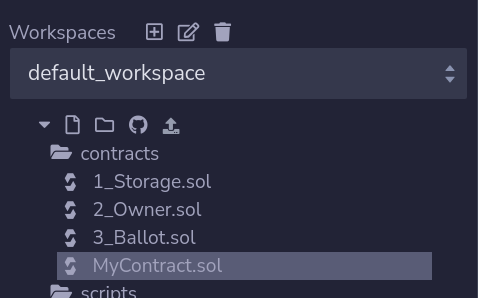
-
ก๊อปปี้โค้ดด้านล่างไปที่ไฟล์
MyContract.solที่เราสร้างไว้
// SPDX-License-Identifier: MIT
pragma solidity ^0.8.7;

contract MyContract {
    mapping(address => int256) public counter;

    function increase() public {
        counter[msg.sender] += 1;
    }

    function decrease() public {
        counter[msg.sender] -= 1;
    }

    function getYourCounter() public view returns (int256) {
        return counter[msg.sender];
    }
}
การทำงาน contract ด้านบนจะเป็นการนับขึ้นหรือนับลงสำหรับ address ที่มากระทำกับ contract นี้ จะเห็นได้ว่าเมื่อเราทำการ increase หรือ decrease counter ether ใน account test ที่ ของเราจะลดลงเรื่อย ที่เป็นแบบนั้นเพราะว่าการเปลี่ยนแปลงใน blockchain แต่ละครั้งจะต้องมีการ validate transaction ซึ่งเราจะต้องเสียค่าธรรมเนียมให้กับการ validate นั้น
-
คอมไพล์ contract ของเรา ให้ก๊อปปี้ ABI เก็บไว้เพื่อใช้ในการสร้าง interface ที่จะถูกใช้โดยโปรแกรมของเรา

-
ทดสอบ contract เราโดยการ deploy contract ไปที่
JavaScript VM (London)environment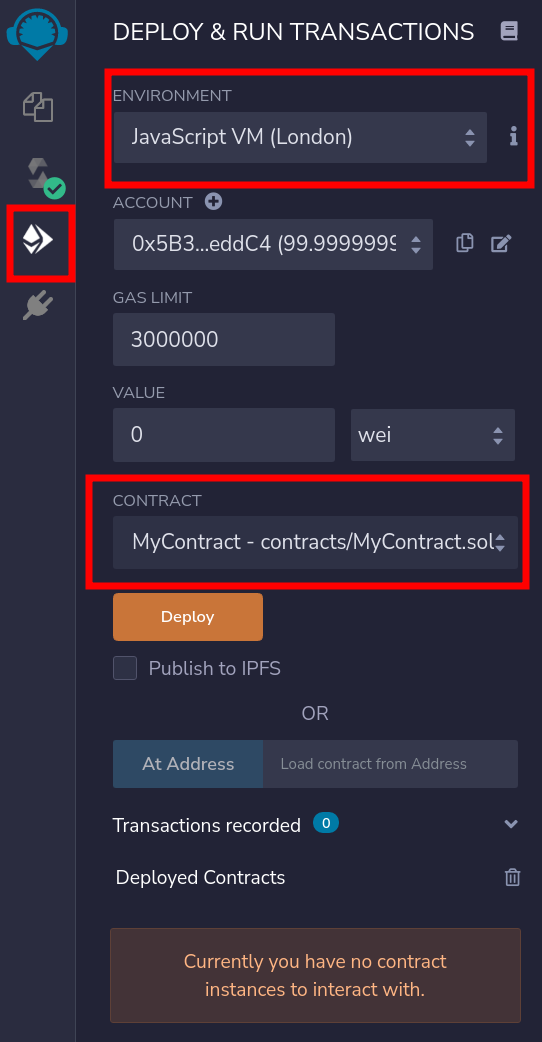
-
เมื่อเราคลิก
DeployจะมีDeployed Contractsปรากฎอยู่ด้านล่าง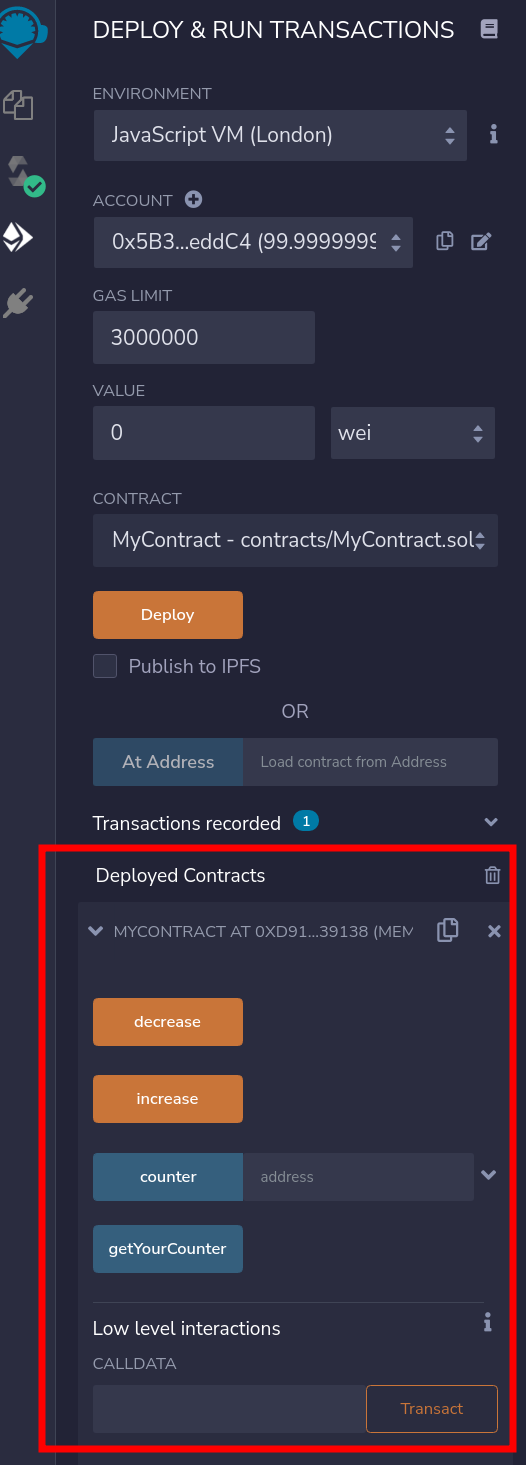
- ลองทดสอบ contract ของเราโดยลองคลิก
increase,decreaseหรือgetYourCounter - เมื่อมันใจเเล้วว่า contract ทำงานถูกต้อง ให้ไปเซ็ต metamask ของเราให้ไปต่อกับ test network ของ BSC จากนั้นให้เปลี่ยน environment ที่จะ deploy เป็น
Injected Web3 - ตัว metamask จะมีการขอ permission ให้เราต่อกับเว็บ remix ซึ่งให้ allow ไป
-
ให้ลอง deploy contract เเล้วก็ลองเทส contract ดู
ป.ล. ให้ก๊อปปี้ contract address เก็บไว้ด้วย
สร้างโปรแกรมที่จะต่อกับ Smart Contract ที่เรา deploy ไป
- สร้างโฟล์เดอร์ ชือ
smart-contract-connectไว้ที่ไหนก็ได้ - เข้าไปในโฟล์เดอร์นั้น เเล้วสร้างโฟล์เดอร์ชื่อ
contracts - ใช้คำสั่ง
go mod init smart-contract-connectจะได้ไฟล์go.modมา - จากขั้นตอนการสร้าง Smart Contract ที่เราก๊อปปี้ ABI เก็บเอาไว้ ให้สร้างไฟล์ชื่อ
MyContract.abiเเล้วเอา data เข้าไปใส่ในไฟล์นั้น - สร้าง go interface ที่จะต่อกับ contract ด้วยคำสั่งต่อไปนี้
$ docker run --rm -v <path-to-project>/smart-contract-connector:/sources ethereum/client-go:alltools-latest abigen --abi=/sources/MyContract.abi --pkg=MyContract --out=/sources/contracts/MyContract.go
- เราจะได้ไฟล์
MyContract.goถ้าเราเปิดไฟล์นั้นไม่ได้ให้ใช้คำสั่งsudo chown <your-user>:<your-user> ./contracts/MyContract.goและsudo chmod 755 ./contracts/MyContract.goเพื่อเพิ่มสิทธิการเข้าถึงไฟล์ - สร้างไฟล์ชื่อ
main.go - ก๊อปปี้โค้ดด้านล่างไปยังไฟล์
main.goจากนั้นใส่ค่าตัวแปรที่จำเป็นลงไปแล้วเซฟไฟล์
package main

import (
	"context"
	"crypto/ecdsa"
	"fmt"
	"log"
	"math/big"

	MyContract "smart-contract-connector/contracts"

	"github.com/ethereum/go-ethereum/accounts/abi/bind"
	"github.com/ethereum/go-ethereum/common"
	"github.com/ethereum/go-ethereum/crypto"
	"github.com/ethereum/go-ethereum/ethclient"
)

const bscTestNetworkUrl = "https://data-seed-prebsc-1-s1.binance.org:8545/"
const bscTestNetworkChainId = 97
const privateKey = ""        // ใส่ private key ครงนี้
const publicKey = ""         // ใส่ public key ตรงนี้
const MyContractAddress = "" // ใส่ contract address ตรงนี้

func main() {
	client, err := ethclient.Dial(bscTestNetworkUrl)

	if err != nil {
		log.Fatal(err)
		return
	}

	contract, err := MyContract.NewMyContract(common.HexToAddress(MyContractAddress), client)

	if err != nil {
		log.Fatal(err)
		return
	}

	// increase counter
	txOpts, err := GetDefautlTransactionOpts(client, privateKey, bscTestNetworkChainId)

	if err != nil {
		log.Fatal(err)
		return
	}

	contract.Increase(txOpts)

	// get counter
	callOpts := GetDefaultCallOpts(publicKey)
	counter, err := contract.GetYourCounter(callOpts)

	if err != nil {
		log.Fatal(err)
		return
	}

	fmt.Println(counter.Text(10))
}

// Get default CallOpts
func GetDefaultCallOpts(publicKey string) *bind.CallOpts {
	return &bind.CallOpts{Pending: false, From: common.HexToAddress(publicKey), BlockNumber: nil, Context: nil}
}

// Get default TransactionOpts
func GetDefautlTransactionOpts(client *ethclient.Client, privateKeyStr string, chainId uint64) (*bind.TransactOpts, error) {
	privateKey, err := crypto.HexToECDSA(privateKeyStr)
	if err != nil {
		return nil, err
	}

	publicKey := privateKey.Public()
	publicKeyECDSA, ok := publicKey.(*ecdsa.PublicKey)
	if !ok {
		return nil, err
	}

	fromAddress := crypto.PubkeyToAddress(*publicKeyECDSA)

	nonce, err := client.PendingNonceAt(context.Background(), fromAddress)
	if err != nil {
		return nil, err
	}

	gasPrice, err := client.SuggestGasPrice(context.Background())
	if err != nil {
		return nil, err
	}

	txOpts, err := bind.NewKeyedTransactorWithChainID(privateKey, big.NewInt(int64(chainId)))
	if err != nil {
		return nil, err
	}

	txOpts.Nonce = big.NewInt(int64(nonce))
	txOpts.Value = big.NewInt(0)
	txOpts.GasLimit = 3000000
	txOpts.GasPrice = gasPrice

	return txOpts, nil
}
- จากนั้นให้ใช้คำสั่ง
go mod tidyเพื่อดาวน์โหลด dependencies ที่ใช้ - ใช้คำสั่ง
go run main.goเพื่อรันโปรแกรมของเรา จากนั้นลองเช็คผลลัพธ์จาก terminal
ปกติแล้วถ้าเราสร้างโปรแกรมเพื่อจะอ่านข้อมูลจาก blockchain เพียวอย่างเดียวจะไม่จำเป็นต้องใช้ private key แต่ถ้าเราจะเปลี่ยนแปลงบางอย่างบน blockchain ในกรณีนี้จำเป็นที่จะต้องใ้ private key
private key อันนี้สำคัญมาก ไม่ควรจะเผยแพร่ให้คนอื่นรู้ เพราะถ้าคนอื่นรู้เค้าจะสามารถทำอะไรก็ได้กับกระเป๋าเงินของเรา
จบไปเเล้วนะครับสำหรับการสร้าง smart contract และการเขียนโปรแกรมเพื่อที่จะไปต่อ smart contract ที่เราสร้างไว้ แล้วเจอกันใหม่นะครับ